Permission Changes for Data Distribution
Looker is making an important security and permissions update regarding data distribution permissions for end users. This post will cover what is changing, how it might impact your users, and how you can use the lkr CLI tool to audit your instance and prevent disruptions proactively.
This change is being rolled out starting April 15, 2026
tl;dr;
Run the lkr CLI tool to audit your Looker permissions and prevent disruptions from the upcoming permission deprecation. Prerequisite: install uv
uvx --from lkr-dev-cli[tools] lkr \
  --client-id <client-id> \
  --client-secret <client-secret> \
  --base-url <https://<instance>.cloud.looker.com> \
  tools schedule-download-deprecation
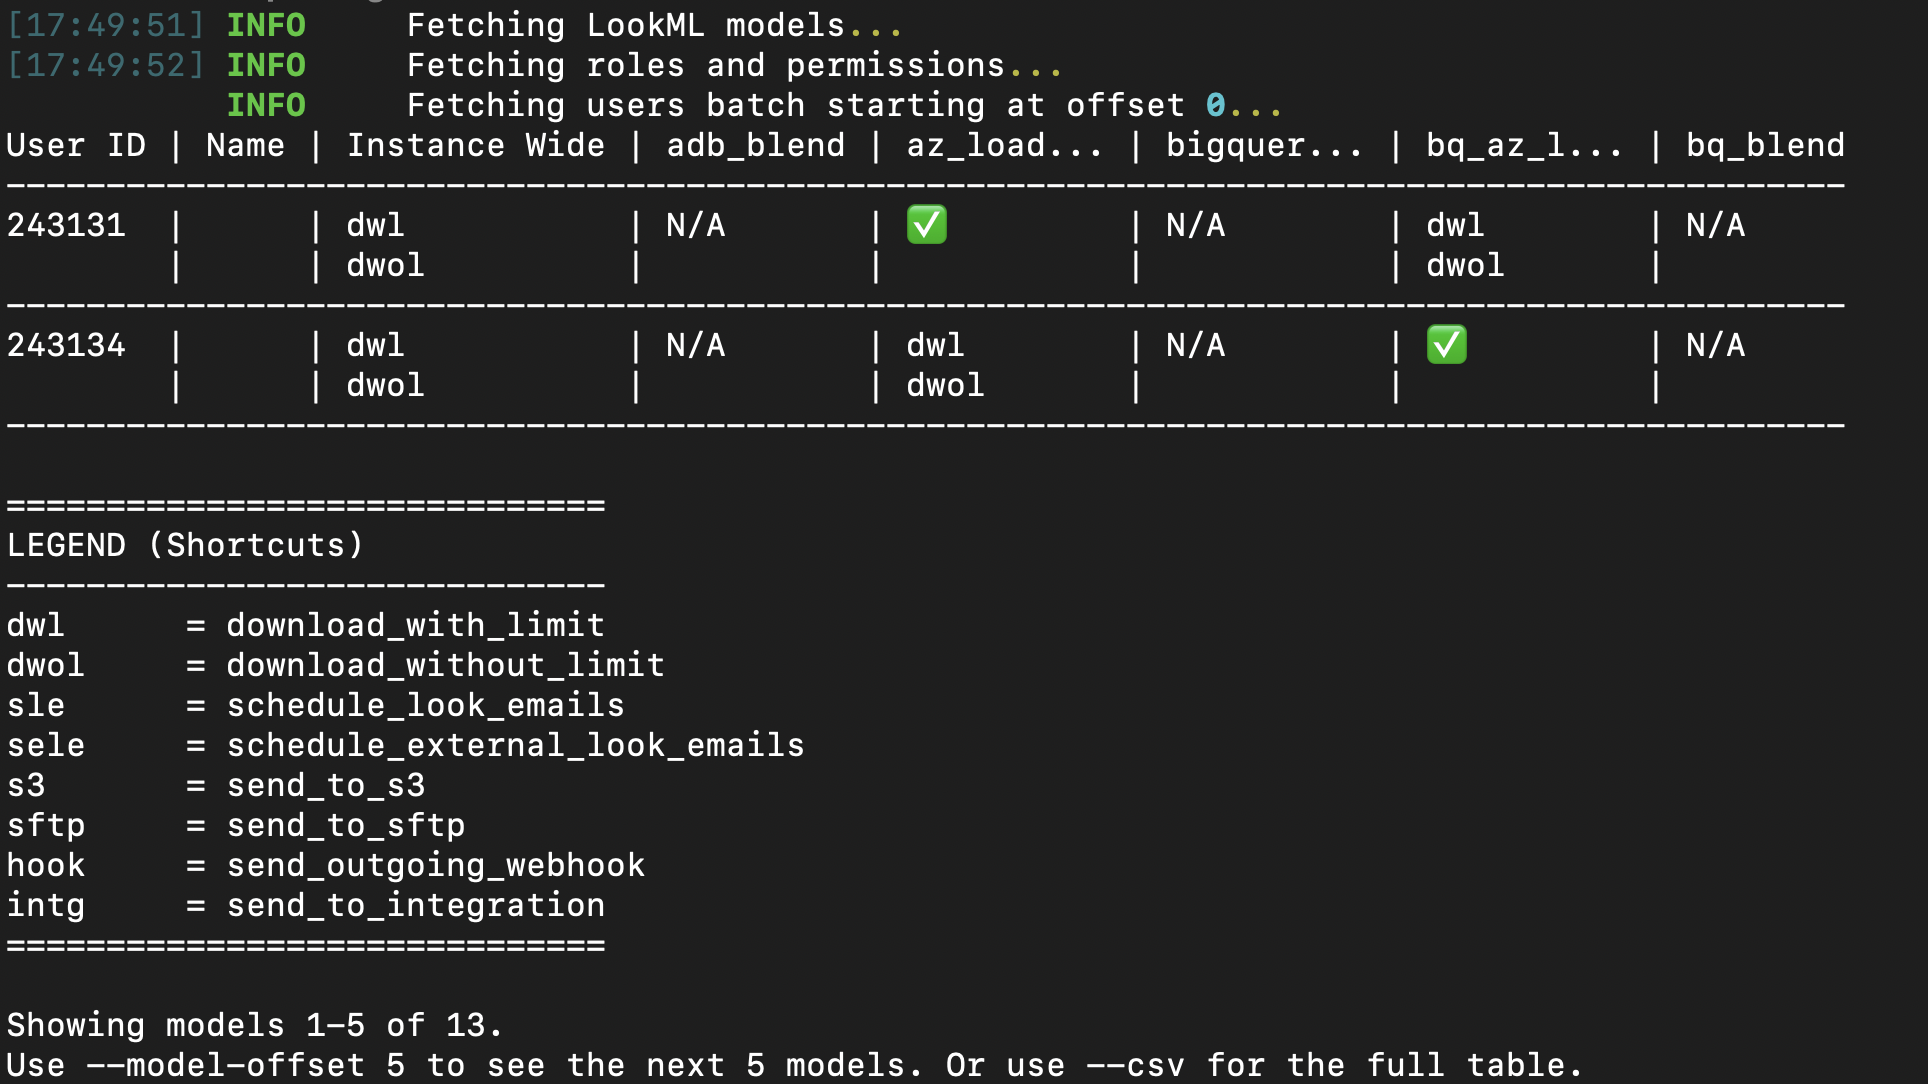
The output is a table of users who will be affected by the permission deprecation. The table will include columns for the user and for every model in your instance. If a user loses permissions after this deprecation, you will see a list of the permissions they will lose. If they don't have access to the model, you will see N/A, and if they won't be losing permissions to the model, they'll see ✅.
What is Happening?
Data distribution permissions—such as downloading and scheduling—were historically documented as enforced at the model level, but they functioned as instance-wide permissions. This discrepancy meant that users might have had broader access to extract data than intended by administrators. This didn't expand their ability to access the data, only their ability to extract it.
To prevent potential data exfiltration and to align the platform's behavior with its documentation, Looker is officially scoping these permissions strictly to the model level.
Impacted Permissions:
download_with_limitdownload_without_limitschedule_look_emailsschedule_external_look_emailssend_to_s3send_to_sftpsend_outgoing_webhooksend_to_integration
Will my Looker instance be impacted?
If all your roles use the All Models model set, you don't need to worry about this change. If you manage multiple roles in Looker and have different permission sets across models, we recommend running this tool to audit your instance.
How Does This Affect My Users?
After this change takes effect, users with download or schedule permissions will only be able to extract data from models where they have explicit action permissions within their designated Model Sets.
For instance, if a dashboard contains data from Model A and Model B, but a user only has schedule permissions for Model A, they will only be able to schedule data from Model A. If they previously relied on instance-wide permissions to distribute data from Model B, they will start encountering "data access denied" errors.
As a Looker Admin, you will need to identify these permission gaps and explicitly grant model-level access to resolve them.
Looker SSO embed users are unaffected by this update. Because these user types already have a matrix of models and their permissions defined by their authentication method, they are inherently properly scoped.
Identifying Permission Gaps Using the LKR CLI
To help Looker admins evaluate the impact of this update on their users, we've introduced the schedule-download-deprecation tool within the lkr CLI. This tool audits all active users and identifies those who hold instance-wide distribution permissions but are missing them on specific models they otherwise have access to.
Installation
The easiest way to use this tool is via uv. Other methods are available in the README or in the CLI docs.
uvx --from lkr-dev-cli[tools] lkr tools schedule-download-deprecation
Authentication
You can authenticate with Looker using either OAuth2 or an API Key (Client ID and Secret). You can see the full documentation for the lkr cli here, which includes authentication options.
If you are using API Keys, you may also use a .env file with LOOKERSDK_CLIENT_ID, LOOKERSDK_CLIENT_SECRET, and LOOKERSDK_BASE_URL, and call the tool like this:
uvx --from lkr-dev-cli[tools] --env-file .env lkr tools schedule-download-deprecation
Exporting the Results
The tool has a few options to help you export the results. The default output in the CLI is a table of users and their model permissions, but you can export the results to a CSV file for easier filtering and analysis on large Looker instances.
uvx --from lkr-dev-cli[tools] lkr tools schedule-download-deprecation --csv --email
To see a full list of the tool options, like --csv and --email, you can use the --help flag.
uvx --from lkr-dev-cli[tools] lkr tools schedule-download-deprecation --help
Understanding the Output
The output table provides a clear breakdown of which users have instance-wide permissions but lack them on specific models.
- Instance Wide: Lists the abbreviated permissions the user currently holds across the instance.
- Model Columns (e.g.,
thelook,finance):✅: The user has the necessary target permissions explicitly defined for this model.- Blank: The user does not have instance-wide target permissions to begin with (not impacted).
N/A: The user does not have any access to this model (not impacted).- Permission Abbreviations (e.g.,
dwl,sle): The user is missing these specific permissions for this model and will lose their distribution capabilities when the deprecation is enforced.
Next Steps
By running this tool, you can proactively adjust your Role assignments and Model Sets before the deprecation phases begin. Ensuring that users have explicit model-level permissions for the data they need to distribute will guarantee a seamless transition and zero disruption to your business workflows.