Looker MCP and AI Agents Custom Connector for Microsoft Power Platform
Custom Connector for Microsoft Power Automate, Power Apps, and Copilot Studio. Connects Power Platform flows to Looker MCP tools (/mcp) and AI Agent conversation endpoints (/api/4.0/) using OAuth 2.0 authentication.
Features
- Authenticates requests with OAuth 2.0 access tokens using
Authorization: Bearer <access_token>. - Executes
/mcpqueries includingtools/listandtools/callactions likerun_look. - Connects to AI Agent endpoints to list agents, start conversations, and exchange messages.
- Passes through user OAuth access tokens directly without requiring service account admin credentials or
login_userimpersonation.
Prerequisites
- Access to a Microsoft Power Platform environment (Power Automate, Power Apps, or Copilot Studio) with permissions to create custom connectors.
- Access to a Looker instance.
- The Looker OAuth 2.0 Access Token Proxy running locally or deployed to serve OAuth 2.0 authentication.
Looker OAuth 2.0 Access Token Proxy
The oauth-2-access-token directory contains a Node.js proxy service designed for Looker API integration with Power Automate and custom connectors.
Implementation Details
- Acts as an OAuth 2.0 authorization server between Power Platform and Looker, handling 3-legged PKCE authorization flows, AES-256-GCM payload encryption, and Looker user token generation via
login_user. - Connects custom connectors using standard RFC 6749 OAuth 2.0 authorization code and token endpoints (
/oauth/authorizeand/oauth/token). - Authenticates individual users via Looker login and dynamically issues 60-minute user-specific access tokens (
login_user). - Returns
expires_in: 3600responses so Power Automate handles background token refresh and HTTP 401 retries automatically. - Rejects token requests for disabled or deleted Looker users with HTTP 400
invalid_grant, causing Power Automate to invalidate the connection and halt flow execution.
Setup and configuration details are in oauth-2-access-token/README.md.
Setup Instructions
Import the Custom Connector
- Open Power Automate or Power Apps.
- Navigate to Custom Connectors, select New custom connector, then choose Import an OpenAPI file (or OpenAPI URL).
- Set Connector title to Looker_MCP_and_AI_Agents (or your preferred alphanumeric name), select looker_mcp_openapi.json, and click Continue.
- On the General tab, update Host from
your-instance.cloud.looker.comto your target Looker instance domain (e.g.mycompany.looker.com). - On the Security tab, configure OAuth 2.0 settings (you can view and copy these values anytime by running
npm run setup-> [5] Print OAuth Settings in oauth-2-access-token):- Set Authorization URL and Token URL to your Looker OAuth Token Proxy endpoints (
https://<your-proxy-domain>/oauth/authorizeandhttps://<your-proxy-domain>/oauth/token). - Enter your proxy Client ID and Client Secret.
- Set Authorization URL and Token URL to your Looker OAuth Token Proxy endpoints (
- Configure the custom code script on the Code tab:
- Toggle Code Enabled to
On. - Under Code File, upload or paste the contents of Script.cs.
- Under Actions, select all operations so the script processes all connector requests.
- Toggle Code Enabled to
- Select Create connector (or Update connector).
- Once saved, copy the generated Redirect URL displayed at the bottom of the Security tab and add it to
ALLOWED_REDIRECT_URISin.env. - Register/update the OAuth Client application in Looker by running
npm run setup-> [3] Register OAuth Client (ornpm run looker:register-oauth) in oauth-2-access-token. - Start the proxy service by running
npm startin oauth-2-access-token.
Create and Authenticate the Connection
- Go to Connections in Power Automate.
- Select New Connection.
- Choose the Looker connector and log in using OAuth 2.0 when prompted.
- Select Create connection.
Connection Sharing and Permissions
In Power Platform, custom connector connections execute based on how ownership and run-only permissions are configured:
- Shared flow connections execute in Looker under the owner's identity. If that owner's Looker account is disabled or revoked, the connection breaks for all users of the flow until re-authenticated with an active user account.
- For team flows or canvas apps, set the custom connector connection under Run-only users to Provided by run-only user. Each user signs in with their own Looker account so actions execute strictly within their individual Looker roles and permissions.
Import Example Power Automate Flow
An example Power Automate flow package is included for download:
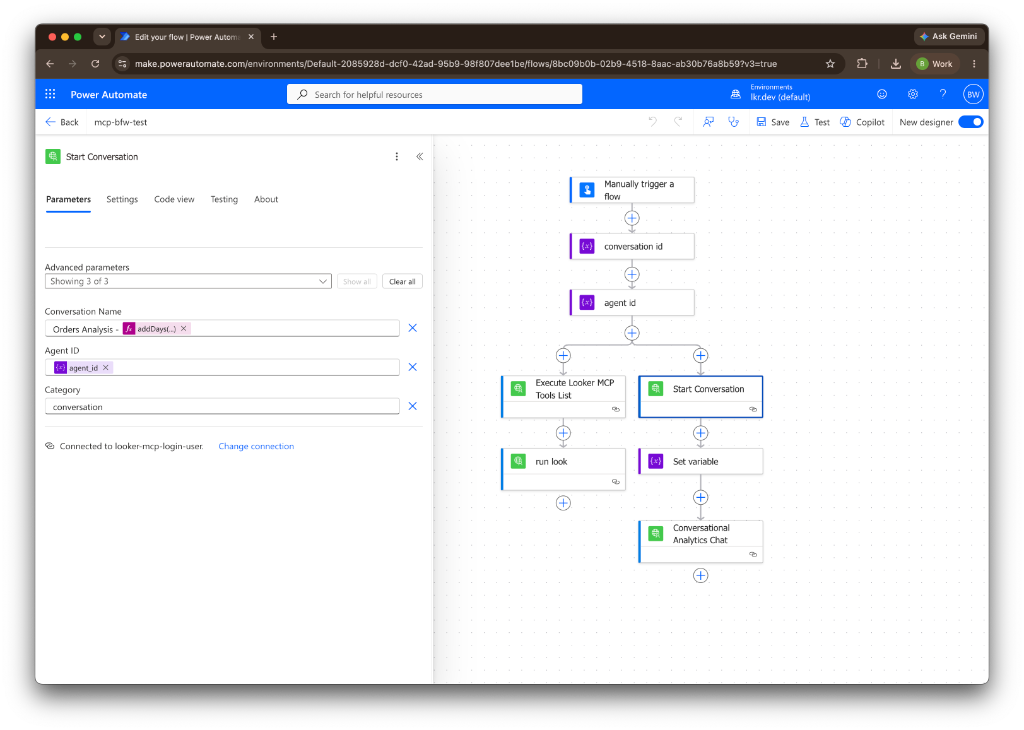
To import the flow:
- In Power Automate, navigate to My flows.
- Select Import -> Import Package (Legacy).
- Upload example-mcp-ca_20260728074343.zip.
- Map the imported flow to your configured Looker custom connector connection and select Import.
Using MCP Tools in Power Automate
List Available Tools
Add the Execute Looker MCP action. Leaving the raw body empty automatically executes tools/list.
Optional payload:
{
  "jsonrpc": "2.0",
  "id": "1",
  "method": "tools/list",
  "params": {}
}
Response example:
{
  "jsonrpc": "2.0",
  "id": "1",
  "result": {
    "tools": [
      {
        "name": "run_look",
        "description": "Executes a saved Look by ID"
      },
      {
        "name": "get_dimensions",
        "description": "Retrieves dimensions for an explore"
      }
    ]
  }
}
Execute an MCP Tool
Pass the tool invocation JSON into the Raw Body of the Execute Looker MCP action.
Request payload:
{
  "jsonrpc": "2.0",
  "id": "2",
  "method": "tools/call",
  "params": {
    "name": "run_look",
    "arguments": {
      "look_id": "25"
    }
  }
}
Response example:
{
  "jsonrpc": "2.0",
  "id": "2",
  "result": {
    "content": [
      {
        "type": "text",
        "text": "[{\"order_items.count\":260,\"order_items.total_sale_price\":34646.69,\"products.category\":\"Outerwear & Coats\"}]"
      }
    ]
  }
}
Using AI Agents and Conversations in Power Automate
List Available Agents
Add the List / Search Agents action to query active agents and select an agent_id.
Start a Conversation
Add the Start Conversation action and pass agent_id in the request body.
Request body:
{
  "name": "Power Automate Session",
  "agent_id": "81d628f8b7564ae38a9659ce049cb905",
  "category": "conversation"
}
Response output:
{
  "id": "965bbb961bba4520b97170a822f17600",
  "name": "Power Automate Session",
  "agent_id": "81d628f8b7564ae38a9659ce049cb905"
}
Post a Prompt Message
Add the Post Conversation Message action with conversation_id from the previous step.
Request body:
{
  "messages": [
    {
      "type": "user",
      "message": {
        "text": "What were our top 5 selling product categories last month?"
      }
    }
  ]
}
Response output:
[
  {
    "id": "32c94f0b9681464d8639220ee512af82",
    "type": "user",
    "message": {
      "text": "What were our top 5 selling product categories last month?"
    },
    "order": 1
  }
]