Looker Embeds & Popup Authentication
If you use Looker private embedding to render dashboards inside a custom web portal, you will eventually run into iframe authentication issues. In a private embed, the user's active browser session with the Looker instance determines whether the content loads.
Think of iframe authentication like trying to enter a Broadway theater. If the ticket scanner at the door doesn't recognize your ticket, they can't verify your identity through a glass barrier (the iframe) for security reasons. Instead, you have to step out of line, walk over to the physical box office window (a popup) to show your photo ID, get your ticket verified, and then return to the main entrance line to scan through.
Before writing a custom popup flow, check if you can use signed embedding (SSO embedding) instead. Signed embedding authenticates users server-side using cryptographic signatures, bypassing browser cookie restrictions and third-party login screens entirely. If your architecture supports it, use signed embedding. But if you must use private embedding—where users must authenticate with their individual Looker or identity provider credentials—you will need this popup workaround.
Why Private Embed Iframe Authentication Fails
Browser security policies prevent loading login pages from third-party domains inside an iframe. If Looker redirect headers attempt to load Google OAuth inside your portal's iframe, the browser blocks the request.
We cannot bypass these headers. Instead, we must authenticate the user in a top-level browser window, such as a popup. Since the popup is a direct window, the IDP loads and authenticates successfully. Once the user is authenticated, the cookie is set for the Looker domain, enabling the embedded iframe to load.
What About the "Bypass Login Page" Feature?
Looker includes a Bypass Login Page setting in its SAML and OIDC authentication configurations.
By default, Looker displays its own login page with an "Authenticate" button. Enabling this setting skips that screen and immediately redirects unauthenticated users to the Identity Provider.
Even with this setting active, Looker still triggers a redirect to the IdP. If the IdP (such as Google OAuth) does not permit being loaded in an iframe, the browser blocks the redirect.
If the setting is disabled, the iframe hangs on the Looker login page. If enabled, the iframe goes blank immediately as the browser blocks the redirect. In either case, direct iframe authentication fails, making the popup pattern necessary.
While "Bypass Login Page" doesn't solve the iframe block by itself, it works beautifully in tandem with the popup pattern. When enabled, opening the top-level popup immediately triggers the redirect to your IdP. If the user already has an active session with their IdP, they will be authenticated and redirected back to the Looker extension automatically. The popup will flash and close itself in a fraction of a second, providing a completely seamless, zero-click login experience.
The Popup Authentication Flow
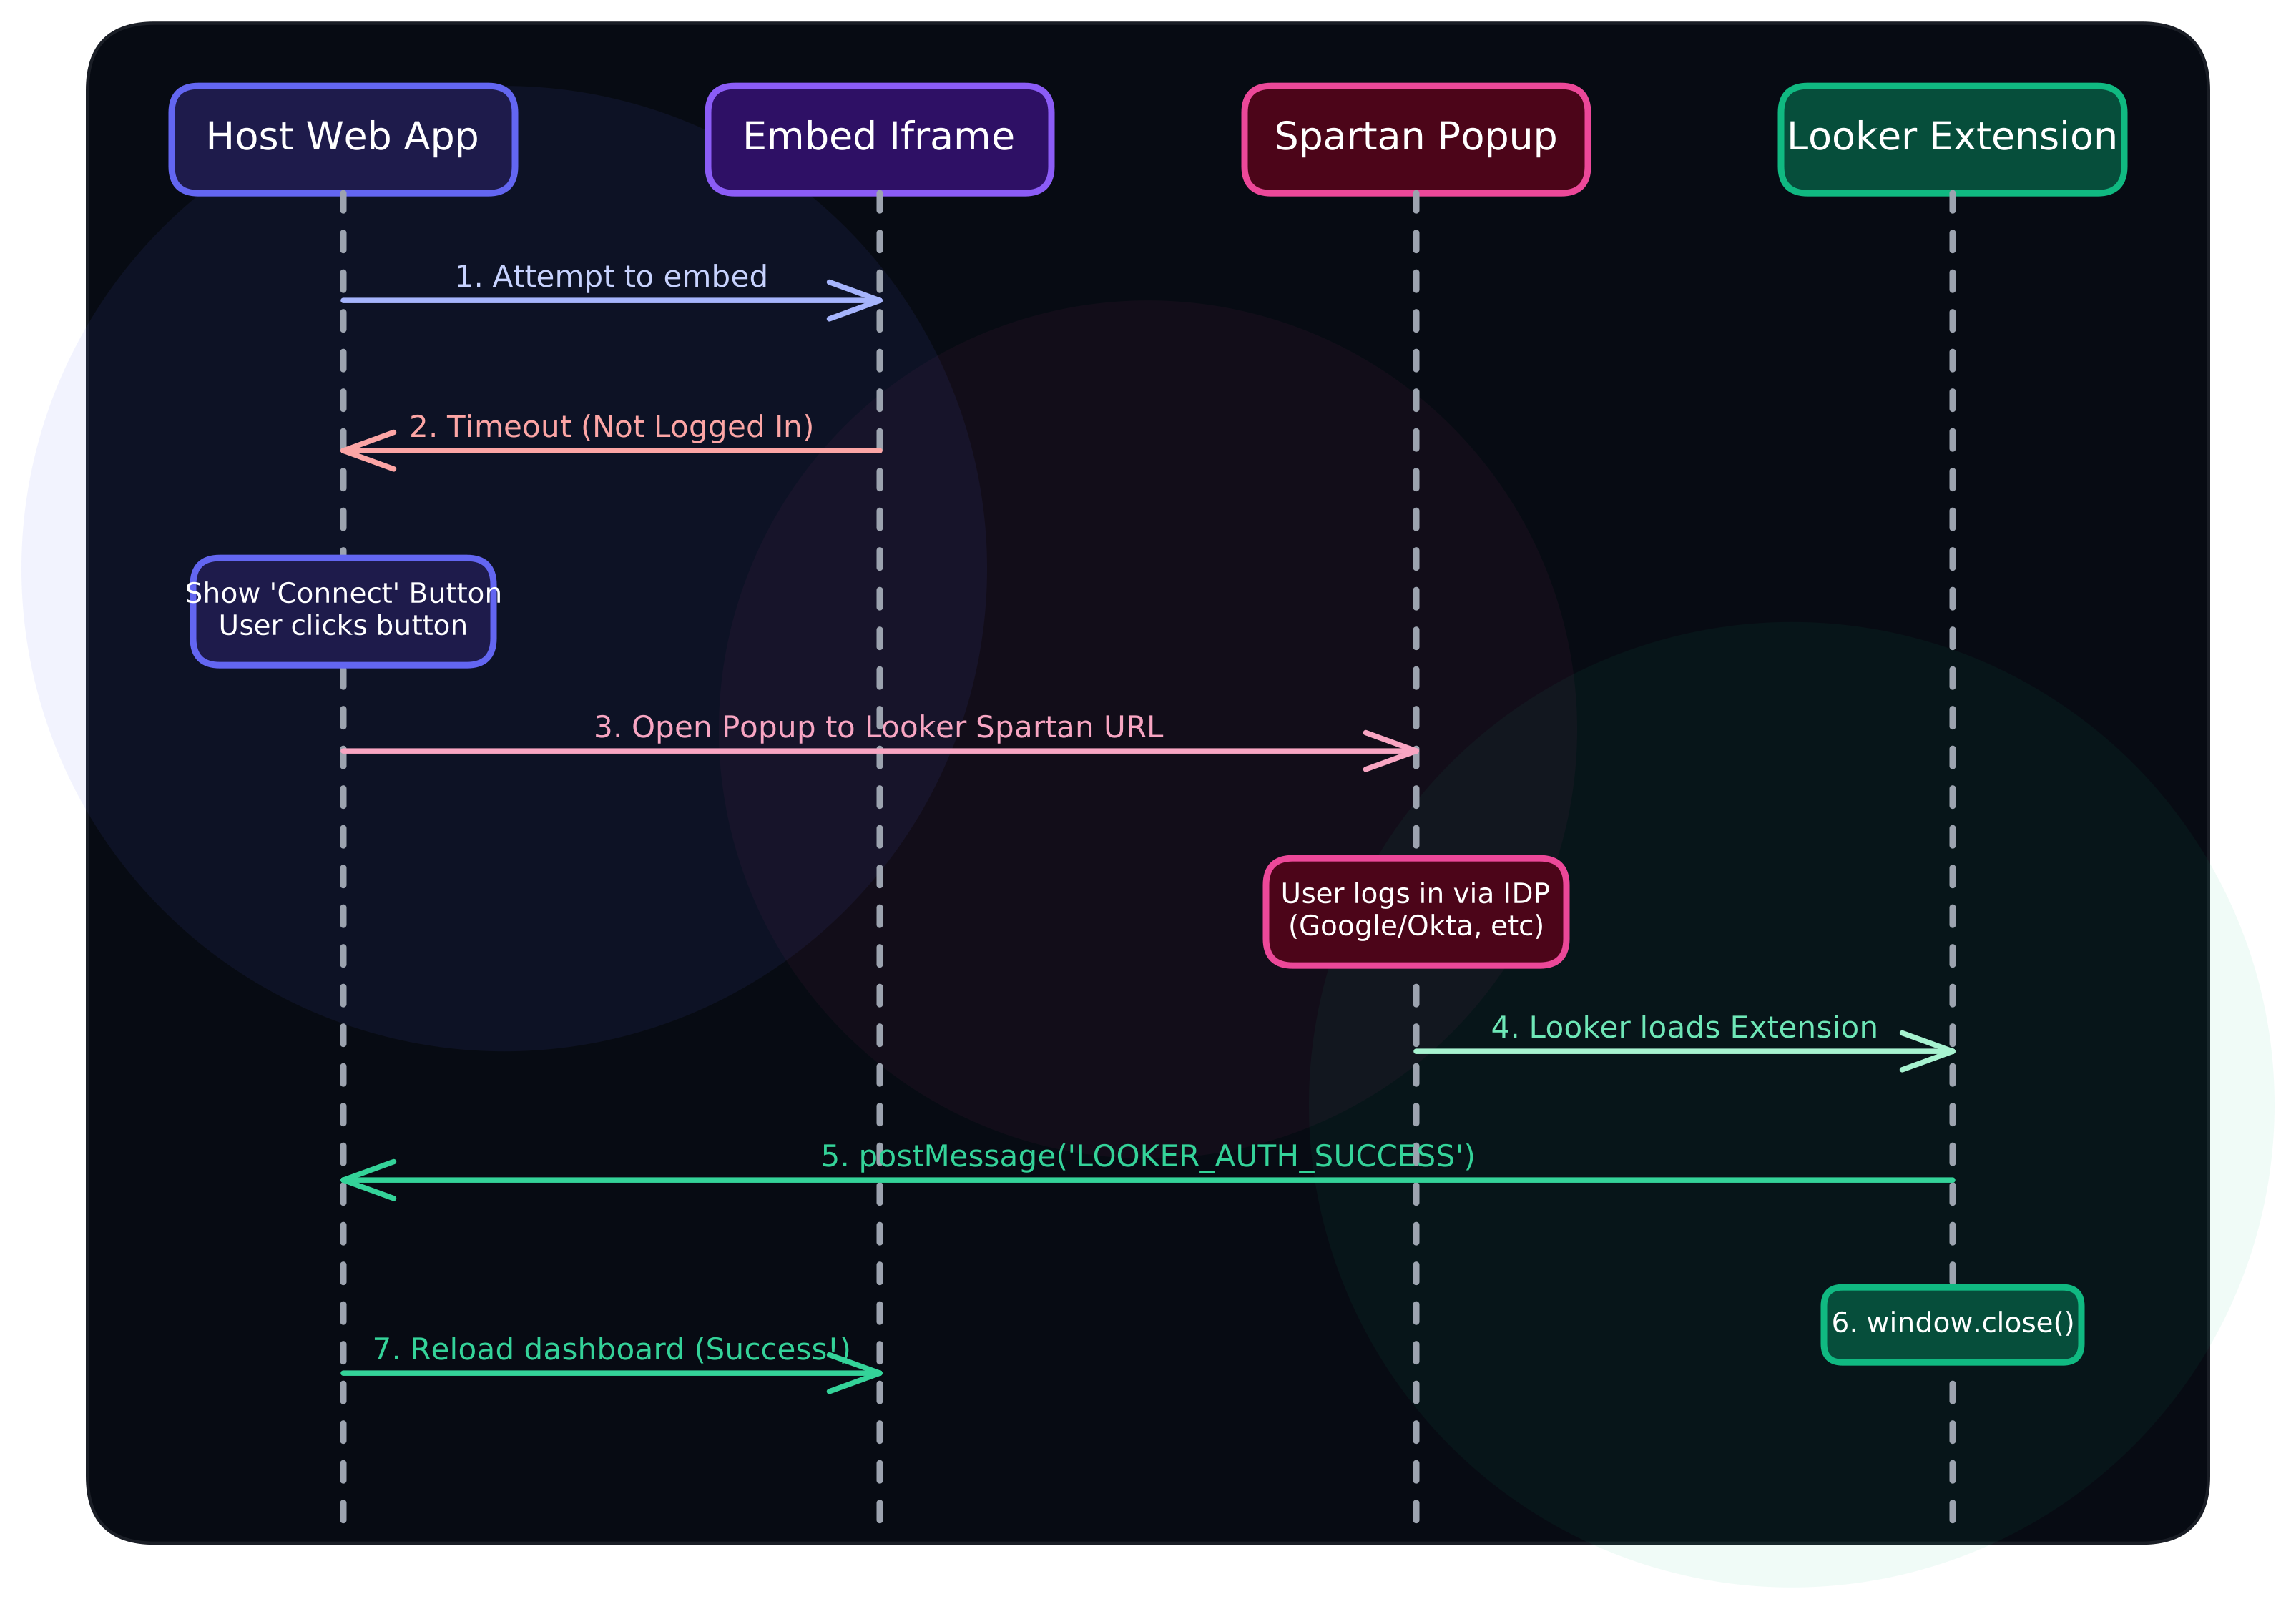
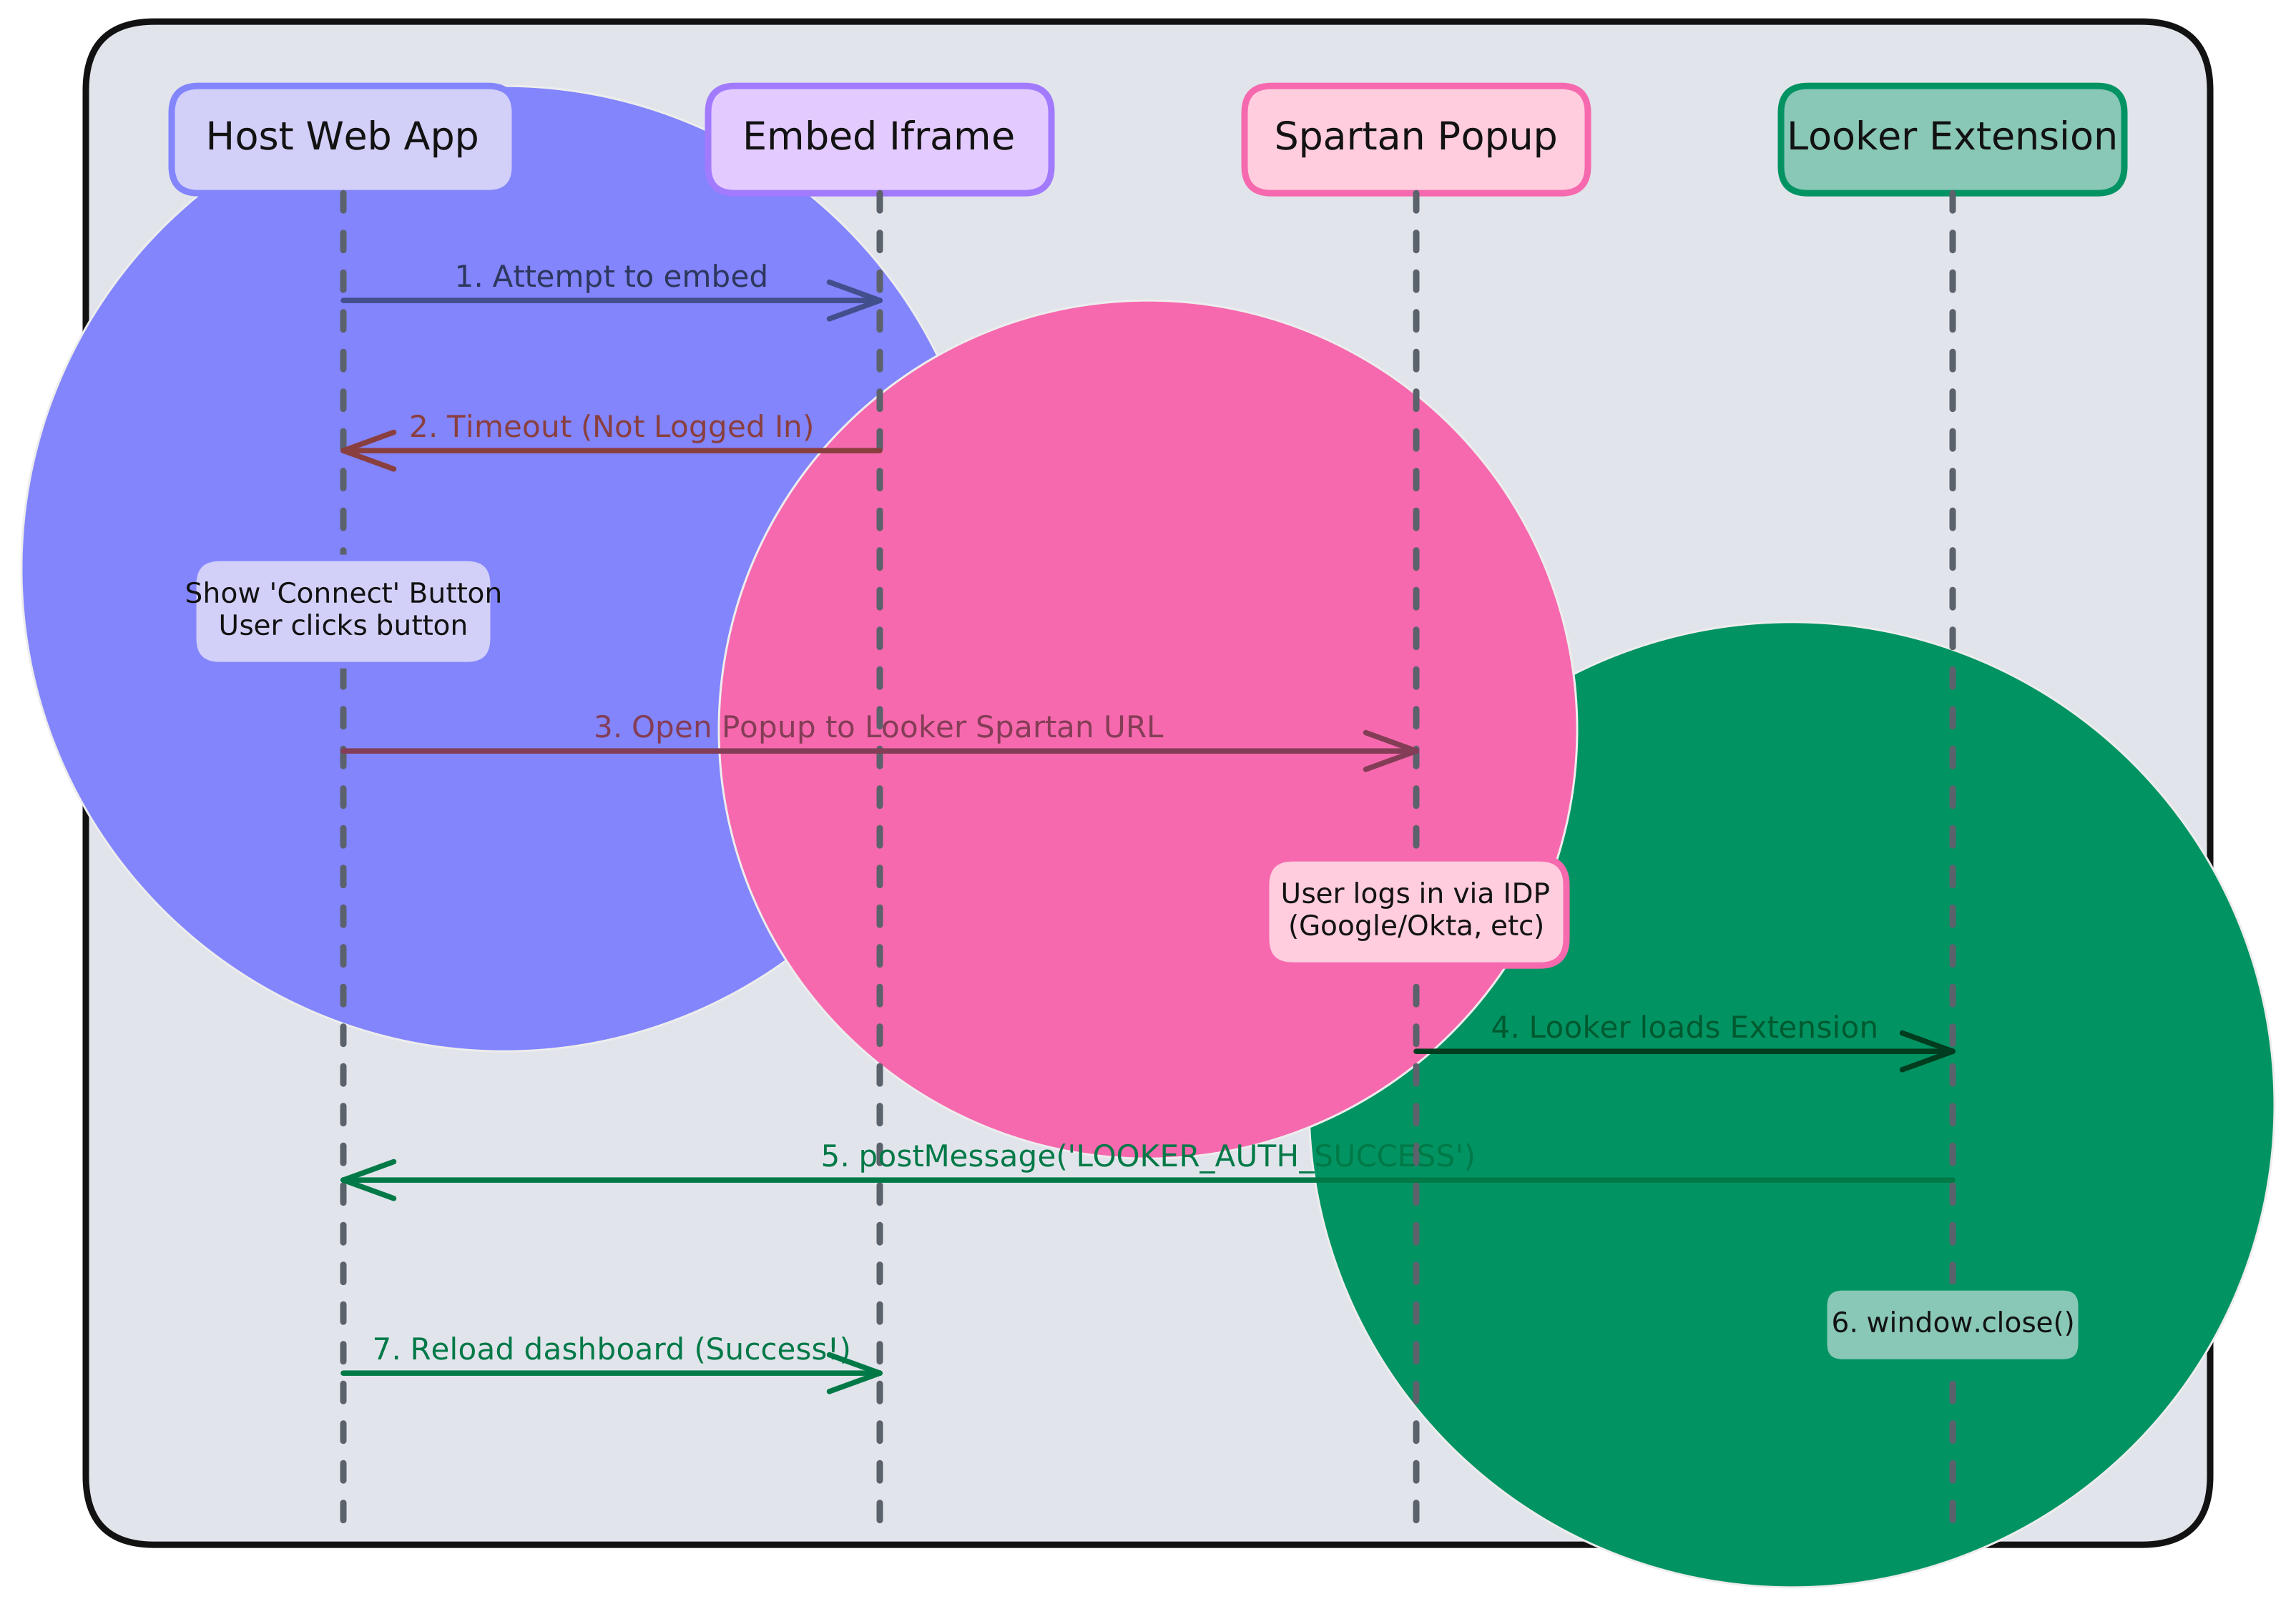
The sequence works by detecting when embedding fails, prompting the user, and using a Looker Extension as a landing page. Here is the operational breakdown:
- The host portal attempts to load the Looker dashboard inside the iframe.
- If the user session is expired, the embed handshake fails or times out.
- The host portal hides the blank iframe and shows a connection prompt.
- The user clicks the prompt, opening a popup pointing to the Looker extension URL on the Looker domain.
- The Looker domain redirects the popup to the IDP. The user logs in.
- Looker completes login and loads the extension inside the popup.
- The extension sends a success message to the host window and closes itself.
- The host portal detects the message and reloads the iframe.
Core Implementation Details
Looker Configuration and the Embedded Domain Allowlist
Before the portal and the embedded iframe can communicate, the host application's domain must be explicitly permitted in Looker.
The Embedded Domain Allowlist is a security setting in Looker that restricts iframe communication to trusted domains. Without this, the Looker Embed SDK cannot complete the connection handshake, and the dashboard:loaded event will never fire, causing the connection check to time out.
To configure this, navigate to Admin > Platform > Embed on your Looker instance. Verify that Embed SSO or Cookieless Embed is enabled, and add your application's domain (such as http://localhost:5173 for local development) to the allowlist.
Detecting Embed Failures in the Host App
The Looker Embed SDK does not expose cookie or session states directly. We detect session issues by setting a timeout on the dashboard:loaded event. If the event does not fire within three seconds, we assume authentication is required.
Here is the detection logic in the host React application:
const builder = LookerEmbedSDK.createDashboardWithId(dashboardId)
  .appendTo(dashboardRef.current!)
  .on("dashboard:loaded", () => {
    loaded = true;
  });

const dashboard = builder.build();
await dashboard.connect();

// Wait up to 3 seconds for the loaded event
await new Promise<void>((resolve, reject) => {
  const checkLoaded = setInterval(() => {
    if (loaded) {
      clearInterval(checkLoaded);
      resolve();
    }
  }, 100);

  setTimeout(() => {
    clearInterval(checkLoaded);
    if (!loaded) {
      reject(new Error("Dashboard load timed out"));
    }
  }, 3000);
});
Opening the Authentication Popup
When the connection fails, the app updates the UI to display a button that launches the popup. The popup points to the extension's Spartan URL (/spartan/<project_name>::<app_id>). In Looker, the /spartan/ route loads extensions in full-screen mode, stripped of all Looker platform UI chrome (like the header navigation or sidebars). This delivers a clean, standalone presentation for the popup window.
const handleLoginClick = () => {
  const width = 600;
  const height = 700;
  const left = window.screen.width / 2 - width / 2;
  const top = window.screen.height / 2 - height / 2;

  // Replace these with your configuration loading mechanism
  const lookerUrl = config.LOOKER_URL;
  const lookerProject = config.LOOKER_PROJECT;
  const lookerAppId = config.LOOKER_APP_ID;
  const authUrl = `${lookerUrl}/spartan/${lookerProject}::${lookerAppId}`;

  popupRef.current = window.open(
    authUrl,
    "LookerAuthenticationPopup",
    `width=${width},height=${height},top=${top},left=${left},resizable=yes,scrollbars=yes`,
  );
};
Signalling Success from the Looker Extension
Once Looker logs the user in, it mounts the custom extension inside the popup. Since the extension is loaded, we know the Looker session is active. The extension immediately sends a message back to the host window using window.opener.postMessage.
Here is the extension's startup code:
useEffect(() => {
  const message = { status: "LOOKER_AUTH_SUCCESS" };

  if (window.opener) {
    try {
      window.opener.postMessage(message, "*");
    } catch (e) {
      console.error("Failed to postMessage to window.opener", e);
    }
  }
}, []);
After sending the message, the extension displays a success state and invokes window.close() to tidy up the workspace.
Listening for the Success Event
Back in the host app, we listen for the message and retry the embedding sequence once received:
useEffect(() => {
  const handleMessage = (event: MessageEvent) => {
    if (event.data && event.data.status === "LOOKER_AUTH_SUCCESS") {
      setAuthStatus("checking"); // This triggers the embed retry hook
    }
  };

  window.addEventListener("message", handleMessage);
  return () => {
    window.removeEventListener("message", handleMessage);
  };
}, []);
Running the Complete Demo
To test this flow end-to-end, check the configuration steps in the README.md in the popup-signin-extension-example repository. The repository contains the source code for both the host portal application and the Looker extension, including local development configurations for secure HTTPS tunneling.